Enter single supplier invoices
Find this screen
Open: Suppliers > Enter Transactions > Purchase Invoice.
How to
Record an invoice
- Choose or enter the
-
Enter the following:
Invoice date Defaults to today's date Reference The Second Reference An additional reference number if required 
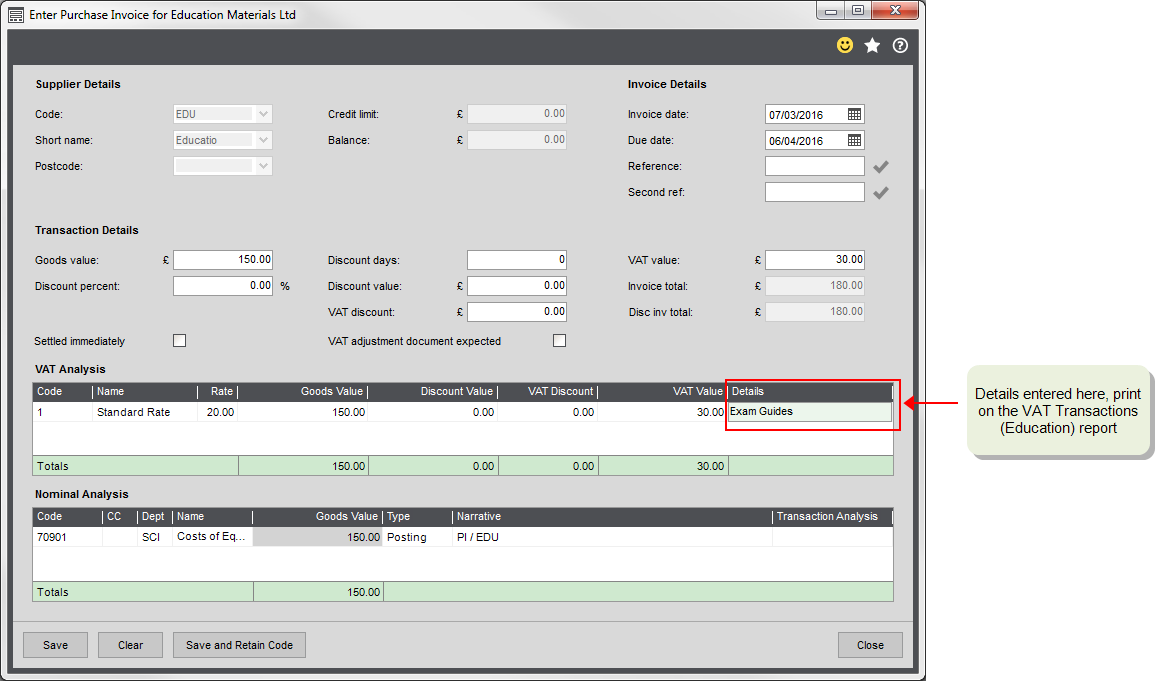
Checks whether you've already entered Goods Value The net VAT Analysis - Details The details of the goods purchased. This prints on VAT Transactions (Education) report. Nominal Analysis - Code The nominal account for the goods value.
The remaining fields display the defaults set on the
|
Due date |
This is calculated from the payment terms set on the |
|
Discount percent and Discount value |
Displays the settlement discount set on the |
|
VAT analysis |
Displays the default VAT rate set on the |
|
Nominal Analysis |
Displays the default nominal account set on the |
Record a foreign currency invoice
When you select a foreign currency
Enter the following additional details:
| Goods value |
Enter this in the same currency as specified on the This should be the same as the currency on the |
| Exchange Rate |
Click This defaults to the rate set on the Currencies and Exchange rates screen. |
Use more than one VAT rate
If your invoice uses more than one VAT rate, you add them in the VAT analysis section.
You enter the total Net and VAT amount for the invoice in the Transaction details section.
In the VAT Analysis section, enter the following details:
- Code - Enter the VAT rate or select it from the drop-down list.
- Goods value - Enter the amount the VAT rate applies to.
- VAT value - Enter the amount of VAT.
- Details - Enter the details of the goods purchased.
For another VAT rate, click to add a new line and repeat.
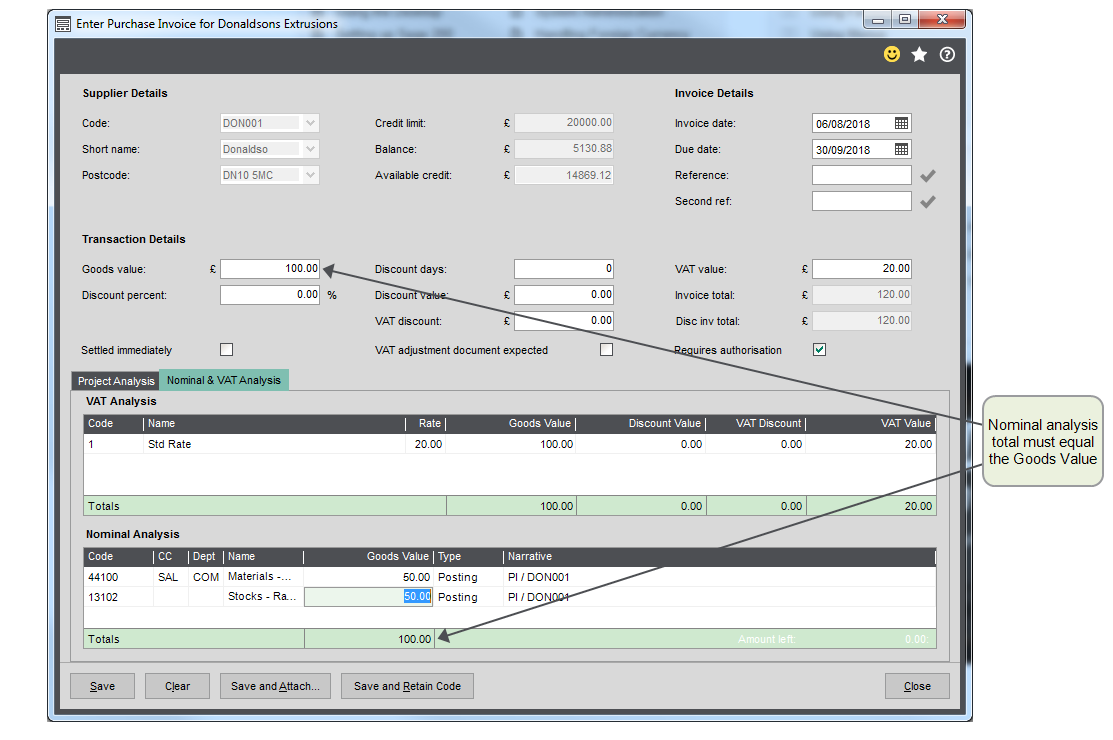
Make sure the Totals in the VAT Analysis section match the Goods Value and VAT Value in the Transaction details section.
Use multiple nominal accounts
If you want to post an invoice to more than one nominal account, you can do this in the Nominal Analysis section.
You enter the total Goods (net) value in the Transaction details section.
In the Nominal Analysis section, enter the following details:
- Code - The nominal account. Select one from the drop-down list.
- Goods Value - Enter the amount that you want to post to the nominal account.
For another nominal account, click to add a new line and repeat.
Make sure the Totals in the Nominal analysis section match the net
Use authorisation
If you have set up authorisation for purchase
To set up authorisation, set Use Authorisation in the Supplier Defaults and Settings. See Set up authorisation for invoices and credit notes.
-
You can't allocate a payment to the invoice until it's authorised.
- You can't allocate an unauthorised credit note to an invoice.
- You can't reverse an unauthorised invoice or credit note.
- Transactions that have not been authorised are assigned an unauthorised query flag (U). You can see this flag on the Supplier Transaction Enquiry.
- Invoices or credit notes that require authorisation are posted to the default nominal account for Unauthorised Purchases. Make sure that you select a default nominal account for Unauthorised Purchases, otherwise postings will be made to the Suspense Account.
- When you authorise the transactions, the original postings (to Unauthorised Purchases) are automatically reversed. You can then apply your usual nominal analysis.
Attach files and scanned documents
You can attach files and scanned documents when you enter a purchase invoice or credit note, enter a nominal journal entry, view sales and purchase invoices, confirm goods received, or produce a VAT Return.
-
To add an attachment or scanned image:
- When you create a purchase invoice or credit note, select Save and Attach.
- When you enter a nominal journal entry, select Post and Attach.
- When you produce a VAT Return, you'll be prompted to add attachments to the return.
- When you confirm goods received, select the Attach Documents check box. You can add file attachments when you click Save to confirm receipt.
-
To attach a file:
-
Select Attach File, then browse to the file that you want to attach and click Open.
Tip: If you can't see the file, change the filter to show All Files. By default, the attachments filter only shows these file types: pdf, jpg, png, gif, txt, xls(x), doc(x), msg.
- Drag-and-drop a file into the Attachments list. For example, you can drag-and-drop multiple files from Windows Explorer, or single files from an Outlook email.
- Once the file has been added, you can enter a comment or reference in the Description column.
-
-
To scan a document and attach it as an image, click Scan Using Device.
- Select Start Scan to see a preview of the scan, and click OK to add it as an attachment.
- If the scanned image doesn't look right, you can select Rescan to scan the document again.
For more information, see Scan and attach documents.
Useful info
About credit limits
You can specify a credit limit on the
This just lets you know that
Your
Using the due date
The Due date is calculated from the Payment Terms set on the
You can change the Due date when you enter an invoice.
The Payment Terms are set to 30 days.
If you enter an invoice dated 15 January, the Due Date is calculated as follows for each option:
| From | Due Date |
|---|---|
| Calendar Monthly | 15 February |
| From Start of Month | 31 January |
| From End of Month | 02 March |
| From Document Date | 14 February |
- Sort the transaction by Due Date in the
- Due Date Report Detailed.
- Due Date Report Summary.
About settlement discounts
A settlement discount is where you are offered a discount if you pay an invoice early. Your supplier usually specifies the number of days the invoice has to be paid within to qualify for the discount.
-
In the UK, if the invoice is paid within the settlement discount period, VAT is only charged on the discounted invoice value.
If you pay the invoice within the agreed number of days, then you need to adjust the VAT claimed on the invoice.
-
In Ireland, VAT is calculated at the goods value regardless of any settlement discount.
The VAT discount can be claimed in three different ways:
-
Your supplier sends you an invoice containing the full VAT. You raise a credit note to claim the discounted VAT.
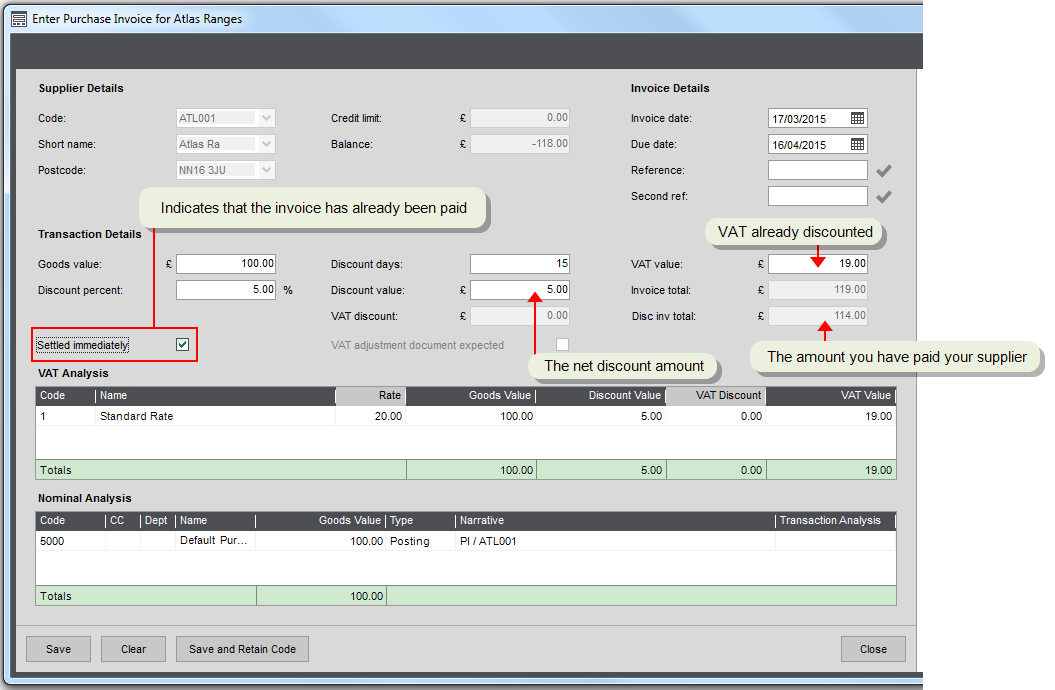
The invoices you receive from your suppliers contain the mandated settlement discount text as illustrated here:
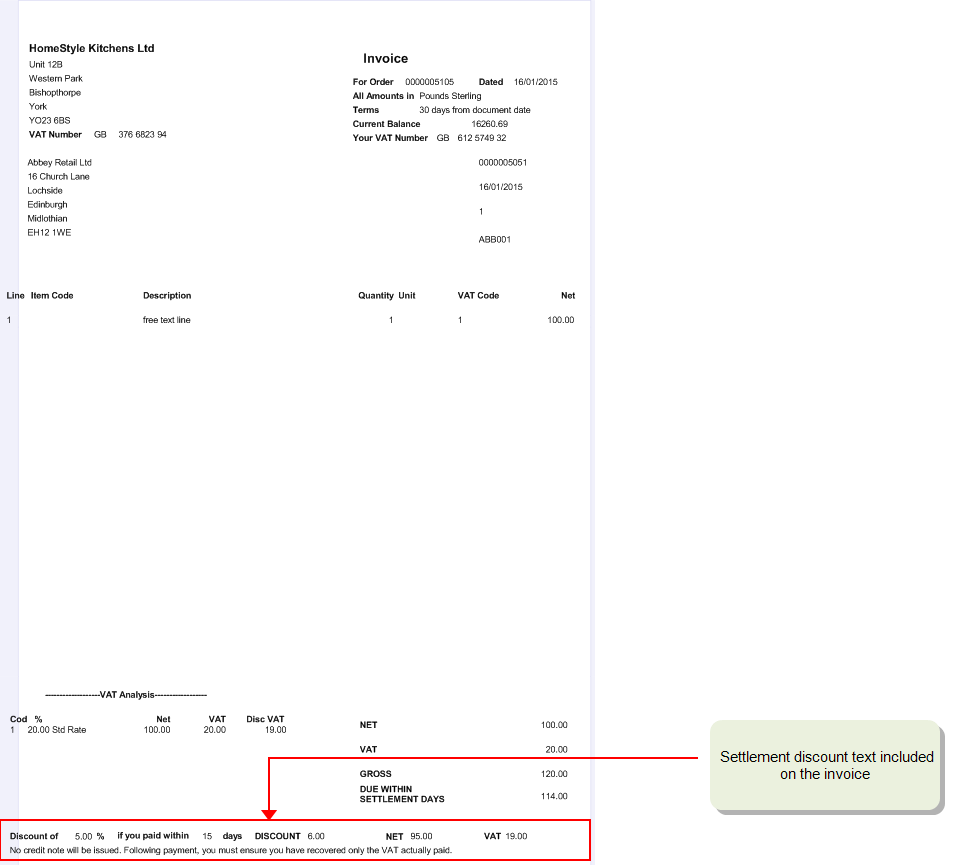
- Your supplier sends you a credit note to account for the VAT discount when you pay the invoice within the discount period.
- Your supplier sends you an invoice with the VAT already discounted. This usually happens when you've paid the invoice in advance.
How to enter settlement discounts
-
Enter the settlement details on the invoice. The VAT is calculated at the full VAT rate but the Discounted Value shows the amount you would expect to pay within the discount period.
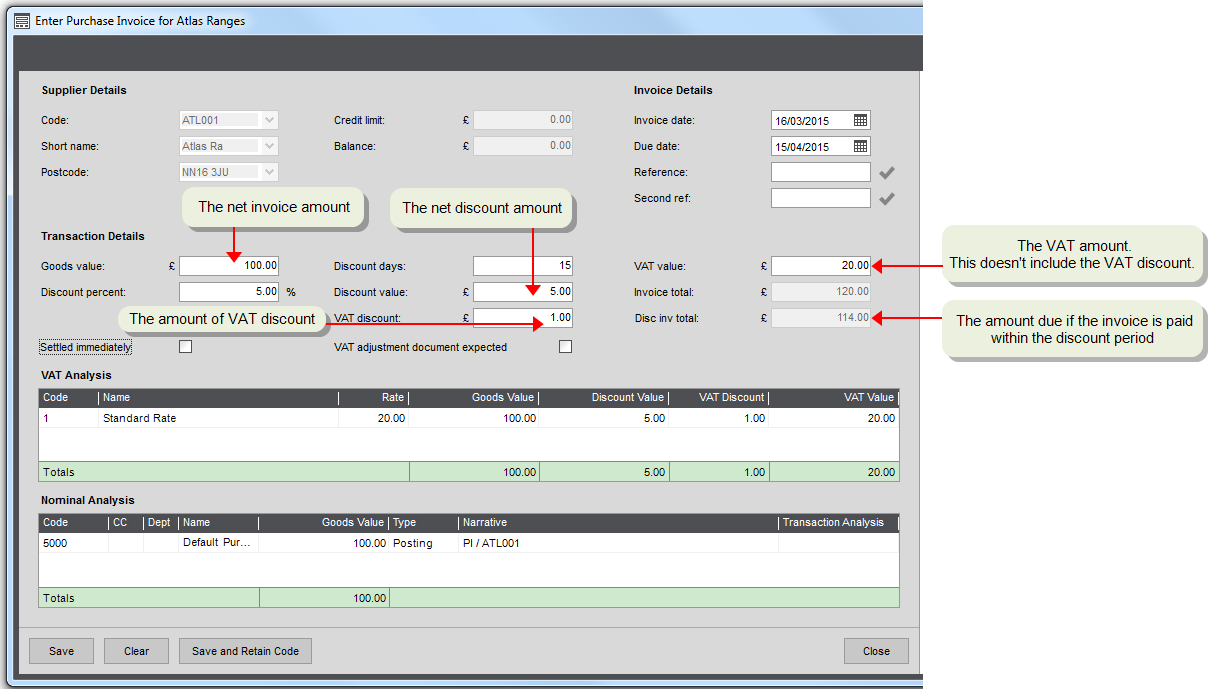
- When you pay the invoice, you pay the discounted value - the total less the net and VAT discounts.
- Record the payment and include the net discount, but not the VAT.
- When you allocate the payment to the invoice, the VAT discount will remain outstanding. You raise a credit note to account for this.
-
Enter the settlement details on the invoice. The VAT is calculated at the full VAT rate but the Discounted Value shows the amount you would expect to pay within the discount period.
-
Select the VAT adjustment document expected option when entering the invoice. This indicates that you're expecting to receive a credit note from your supplier and helps you to identify these transactions.
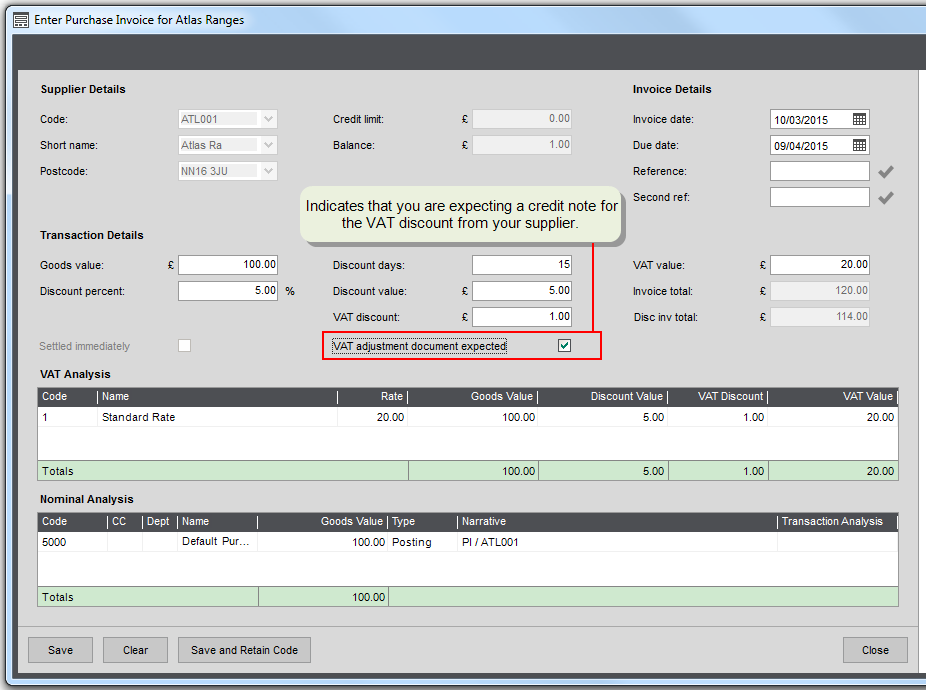
- When you pay the invoice, you pay the discounted value - the total less the net and VAT discounts.
- Record the payment and include the net discount, but not the VAT.
- Once you've allocated the payment to the invoice, the discounted VAT amount is still outstanding. When you receive the credit note from your supplier, you can allocate it to this outstanding amount.
When you enter the invoice, select Settled immediately. The VAT on the invoice is calculated on the discounted value. The VAT discount is set to 0.00 as it's already been taken into account.
No further action is required.
See Settlement discounts on purchase transactions.
Recording VAT on your purchases
As the VAT126 needs to contain the VAT registration number of the supplier and the details of what you've sold and returned, you need to make sure that you enter these details on your transactions in Sage 200.
-
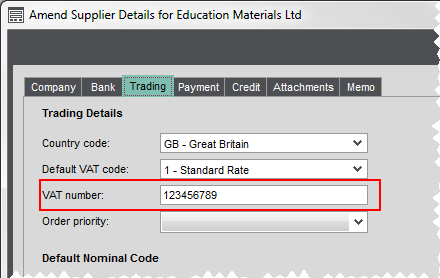
Before you enter purchase orders and invoices, enter the VAT number (VAT registration number) on the supplier's account. This will make sure that it's included on the report for all items bought from each supplier.
- Open Suppliers > Create & Amend Accounts > Amend Supplier Details.
-
Select the Trading tab and enter the VAT number.
-
When you enter purchase transactions, either via a purchase order or directly against the supplier's account, you use the same Purchase invoice screen. On this screen, enter the Details of the item purchased, alongside the VAT rate.
What happens when I
Save an invoice?
The nominal account and supplier account are updated immediately, unless the invoice is dated in a future period. In this case, the transaction is posted when the period is opened.
- The supplier account balance is updated.
-
The transaction is posted to the following nominal accounts:
Nominal Account Debit Credit Purchase Account Net goods value Tax Input VAT amount Creditors Control Account Gross value
Fix it
How can I check whether I have already entered this invoice?
Click the tick icon next to the Reference or Second Ref. This checks to see if an invoice with the same date and reference number already exists.
Why is the invoice date highlighted in red?
This is because the
Check the date and try again.